Exporting records for an FOI or records request
A walkthrough of producing exactly the records a request covers: filter the Archive, export the view or build a one-off export, name it with the case number, download and verify it, and schedule a standing export for recurring requests.
Overview
An FOI, GIPA, RTI or other records request usually names some accounts, a period and sometimes a subject. Brolly's job is to let you produce exactly those records, with their full history and metadata, as a file you can attach to the response. This article walks through that from start to finish. The controls themselves are described in Exports and Using the Archive.
There are two ways to get there, and which one you use depends on the request:
- Export a filtered Archive view when the request is narrow or has a subject — a keyword, a complaint reference, a particular thread. You filter the feed until it shows the right records, then export what you see.
- Build a one-off export in the wizard when the request is "everything these accounts published between these dates". The wizard takes accounts and dates directly, with no need to filter first.
Step 1: Work Out the Scope
Before you open Brolly, write down what the request actually asks for:
- Which social media accounts (and therefore which platforms)
- The date range — and whether it means the date something was published or the date it was captured
- Whether it covers public activity (Feed: posts, comments and replies), private conversations (Messages), or both. Feed and Messages are always exported separately — see Why Feed and Messages are exported separately
- Any subject — a keyword, a name, a project, a case reference
Step 2A: Filter the Archive and Export the View
Use this route for a request with a subject, or whenever you want to check what you are about to export before you export it.
- Click Archive in the sidebar. Feed opens. Open Filters and click Reset filters so nothing left over from earlier work narrows the result, then set the scope the request needs: the feed opens on Our content (only what your accounts published), so if public comments and replies are in scope switch the content filter to All content, and inside Filters leave Record type on All records and Posted by on Anyone
- Narrow to the accounts: open All sources on the toolbar and tick only the accounts the request names, or use Select accounts inside Filters
- Set the period: open Filters, choose Timeframe → Custom and set the start and end dates, then Apply filters. The Archive filters by the date a record was captured, shown in your browser's timezone; if the request is framed by publication date, allow a margin either side and check the records at the edges
- If the request has a subject, type it into the search box. Switch Mode to Exact phrase for a specific quote, or Any terms when you are not sure which words were used
- Read the record count beneath the toolbar and skim the feed, opening a few posts and replies to confirm they are what the request describes. If it is too broad or too narrow, adjust the filters until it shows what the request covers
- With filters active, click Export in the group of buttons at the right of the toolbar. The export panel opens with the scope already set to your filtered view; choose a format, name it (see Step 3) and confirm
For a small set of specific records, tick them in the feed instead and choose Export from the bar at the bottom. The selection is limited to 25 records at a time, so for anything larger export the filtered view.
For private conversations, go to Archive → Messages, find the conversation and click Export conversation in its header. See Archive Messages.
Step 2B: Build a One-off Export in the Wizard
Use this route for "everything from these accounts between these dates".
- Click Exports in the sidebar, then New export
- Type — leave One-off export selected and choose a Format. PDF suits most FOI responses; see Choosing a format
- Scope — choose Feed or Messages, then Choose accounts and tick only the accounts the request names. Each platform shows how many of its accounts are ticked, so check the counts before you move on
- Dates — set the Start date and End date the request specifies. The quick-select buttons (Last month, Last quarter and so on) are handy when the request lines up with a calendar period
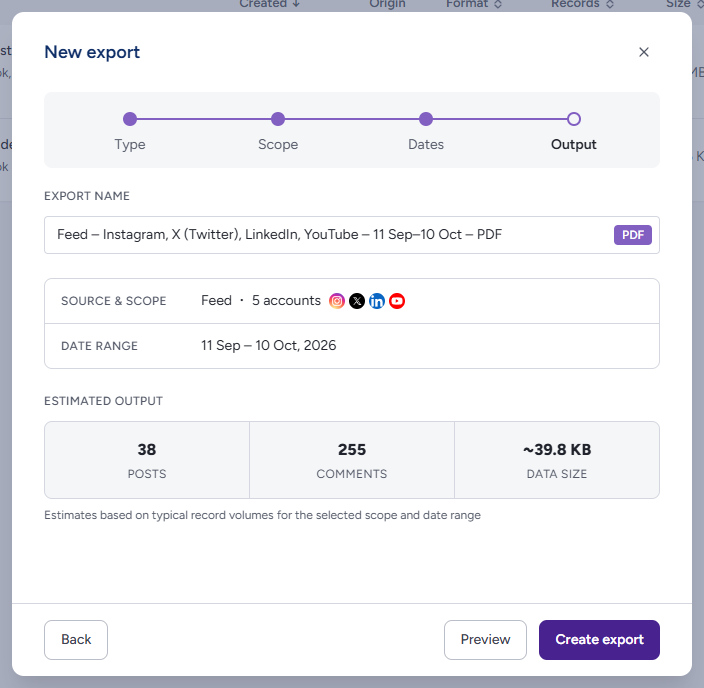
- Output — name the export (next step), check the Source & scope and Date range summary against your notes, and glance at the Estimated output. A figure far from what you expected usually means an account or date is wrong — use Back to fix it
- Click Create export
If the request covers both posts and messages, run the wizard twice, once for each source.
Step 3: Name It with the Case Number
On the Output step (or in the shorter export panel) the Export name arrives as a suggestion built from the source, accounts and dates. Replace it with the request's own reference — for example FOI 2026-0142 — Facebook — Jan–Mar 2026. The name is what you will see under Files and what the recipient will see on the file, so a case number there saves everyone looking inside to find out what it is.
Step 4: Download and Verify
- Go to Exports → Files. Your export is at the top, newest first, with its status. It passes from Queued through In progress to Done; large exports can take a few minutes, and the status updates on its own
- When it reads Done, click Download
- Where a Checksum button is shown beside Download, click it, Copy the SHA-256 value and record it with the case file. Compute the checksum of the downloaded file and confirm it matches — see Verifying a download
Each record in the file carries its metadata, every version Brolly captured and the capture timestamps, so the export is a faithful copy of what Brolly holds. If an export reads Failed, the reason is shown beneath its name; retrying is not available yet, so correct the cause and create a new export with the same scope. If it reads No matching records, the scope matched nothing — check the accounts and dates.
Step 4B: Review Before Release
An export is a faithful copy of what Brolly holds for that scope, which is not the same as the set of records that may be released. Before anything leaves your organisation:
- Check the package covers the whole request — the right accounts, the full period, replies and public comments where they are in scope — and nothing outside it
- Look for personal information of third parties, internal notes and tags (they are included in the formats that carry annotations, see Export formats and contents), and whole threads where only part is responsive
- Apply your organisation's disclosure decisions and redactions to a copy. Keep the original export and its checksum unaltered in the case file, and record separately what was changed in the released version and why
The checksum proves the file is the one Brolly produced; it says nothing about whether the scope was right or the release decision correct — those remain your records officer's.
Step 5: Recurring Requests
For a standing arrangement — a monthly disclosure log, a quarterly records snapshot, an ongoing matter — set up a scheduled export once and let Brolly produce it:
- Click Exports → Schedules, then New schedule
- Type — Scheduled export is already selected; choose a Format
- Scope — choose the source and the accounts the arrangement covers
- Frequency — Monthly (runs on the 1st, covering the previous month) or Quarterly (runs 1 Jan, 1 Apr, 1 Jul and 1 Oct, covering the previous quarter)
- Output — name it after the arrangement and click Create export
The schedule appears under Schedules, and each run lands under Files with Scheduled as its origin once the period closes. Modify changes its name, accounts or frequency for future runs (a format change is not saved in the current release — create a new schedule for a different format); Delete stops it without touching the files it has already produced. See Schedules.
Tips
Export the filtered view rather than a hand-picked selection whenever the request is defined by accounts, dates or a subject — the file then reflects a filter you can describe in the response.
Check the record count and the Estimated output before you create the export. They are the quickest way to catch a wrong account or date.
Keep the case number in the export name and the checksum in the case file. Together they tie the file you sent to the request it answered.
A Feed export never contains private messages, and a Messages export never contains posts. If the request covers both, you will be attaching two files.